Setting Up Wireless Home Internet Connection: A Step-by-Step Guide
Whether you're setting up a new internet connection or upgrading your existing one, establishing a reliable and secure wireless connection at home can be a daunting task. In this comprehensive guide, we'll walk you through the process of setting up a wireless home internet connection, covering everything from connecting your modem and router to securing your Wi-Fi network.
Understanding Your Equipment
Before we dive into the setup process, it's essential to understand the equipment involved in your home internet connection:
- Modem: This device connects to your internet service provider (ISP) and translates the internet signal into a digital format.
- Router: This device receives the digital signal from the modem and distributes it to all the devices in your home through a wireless signal (Wi-Fi network).
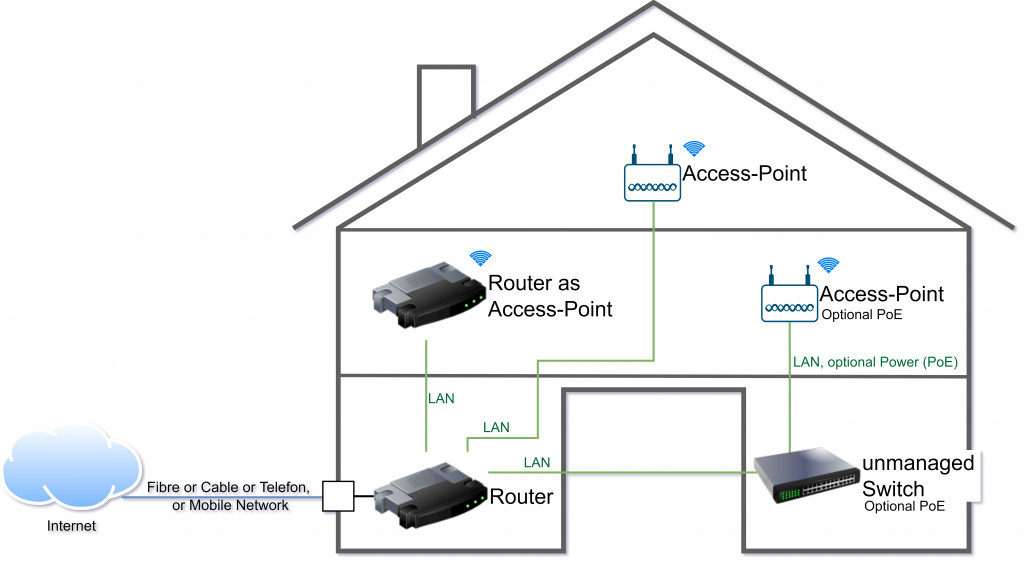
Setting Up Your Router
Once you have your modem and router, follow these steps to set up your wireless home internet connection:
- Connect the modem to your electrical power outlet and the router to the modem using an Ethernet cable.
- Turn on your router and wait for it to boot up.
- Log in to your router using the default IP address (usually 192.168.0.1 or 192.168.1.1) and your router's default username and password (usually printed on the underside of the router).
- Change the default admin password and Wi-Fi network name (SSID) to something secure and unique.
- Configure your Wi-Fi network settings, including the channel, security type, and encryption key (if necessary).
- Save your changes and restart the router to ensure the settings take effect.


")

")


 | T-Mobile 5G Home Internet")


")


")
:max_bytes(150000):strip_icc()/001_connecting-android-device-to-wifi-577618-755697d5bc5649c9aa05c973cc6e76ae-00e87780bf824c61b6872ec93285bdbe.jpg "How to Set Up UniFi - Ubiquiti Help Center")


