G Router Configuration with Router DNS Settings
Configuring your G router with the correct DNS settings is a crucial step in ensuring a seamless internet connection experience. In this article, we'll guide you through the process of configuring your G router with router DNS settings, covering the essentials of DNS settings and troubleshooting tips to help you get the most out of your internet connection.
Understanding DNS Settings
DNS stands for Domain Name System, which translates human-readable domain names into IP addresses that computers can understand. When you type in a website's URL, your device sends a request to a DNS server, which then returns the corresponding IP address. Your router's DNS settings determine which DNS server your device will use to resolve domain names.
Why Change Your Router's DNS Settings?
Changing your router's DNS settings can help resolve connectivity issues, bypass certain restrictions, and enhance browsing performance. If your Internet service provider's (ISP) DNS server is constantly busy or experiencing problems, switching to a different DNS server like Google, Cloudflare, or OpenDNS can be beneficial.
Configuring Your G Router's DNS Settings
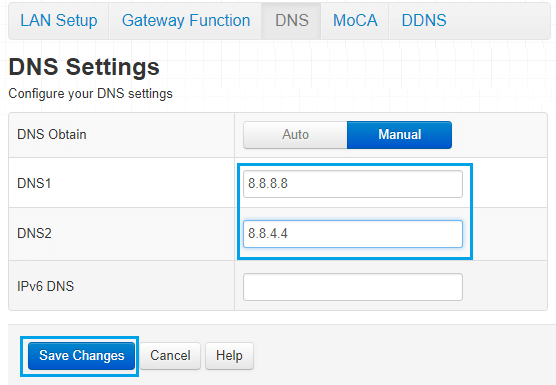
Method 1: Configuring DNS Settings via Web Interface
To access your G router's web interface, open a web browser and type in the router's IP address (usually 192.168.0.1 or 192.168.1.1). Enter the admin username and password to log in. Look for the DNS settings section, usually found under the advanced or internet setting tab. Most routers allow you to input the primary and secondary DNS server IP addresses manually. Enter the desired DNS server IP addresses and save the changes.


:max_bytes(150000):strip_icc()/DNSServers-891f522f2bc2469088df0a11dd687611.jpg "How to Configure IPv6 on ASUS Home Routers - oneuptime.com")
![[OpenWrt Wiki] AdGuard Home](https://documentation.breadnet.co.uk/assets/ee-router-ipv4-config.png "[OpenWrt Wiki] AdGuard Home")


 - GeeksforGeeks")
![Install Tailscale VPN on Rocky Linux / AlmaLinux [Guide]](https://i.ytimg.com/vi/iDvJW0fjhEg/maxresdefault.jpg "Install Tailscale VPN on Rocky Linux / AlmaLinux [Guide]")


